CentOS上搭建Linux时间服务器:使用Chrony实现精准时间同步
前言
这篇文档是我写的第三个时间服务器文档,主要目的是为了堵上短板虽然原本是为了CentOS 8 及以上版本系统准备的,但是我实在CentOS 7下操作的又被吐槽脚本没判断了,话说这里改加些什么判断?怎么加判断?给个主意!接下来估计还会写个Ubuntu上部署的文档,不过最近没空弄Chrony 安装前置准备
# 检查系统是否安装有 Chrony 服务rpm -qa | grep chrony# 卸载 现存 NTP服务yum -y remove chrony*设定时区
# 方法1 :直接设定时区timedatectl set-timezone Asia/Shanghai# 方法2 :选单设定时区tzselect5911# 方法3 :将时区信息拷贝,覆盖原来的时区信息cp /usr/share/zoneinfo/Asia/Shanghai /etc/localtime安装 Chrony 服务
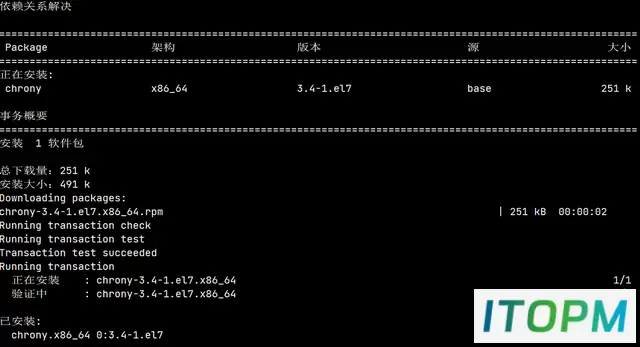
# 安装 Chrony 服务sudo yum install -y chrony启动 Chrony 服务
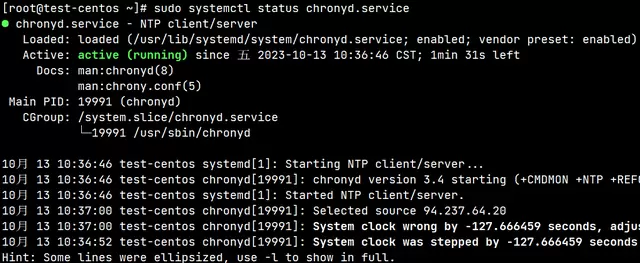
# 启动 Chrony 服务sudo systemctl start chronyd.service# 设置 Chrony 服务 为开机自启动sudo systemctl enable chronyd.service# 检查运行状态sudo systemctl status chronyd.service# 备用命令# 停止 Chrony 服务sudo systemctl stop chronyd.service# 重启 Chrony 服务sudo systemctl restart chronyd.serviceChrony 服务器端 配置
修改 Chrony.conf 配置文件
# 打开 Chrony.conf 文件sudo nano /etc/chrony.conf# 修改原文件 第 3~6 行,时间服务器内容# {server ntp.aliyun.com iburstserver time1.cloud.tencent.com iburstserver 210.72.145.44 iburstserver time.windows.com iburst# }# 修改原文件 第 26 行,时间服务器客户端地址范围# {allow 172.16.0.0/16# }# 方法2:# 修改公网上游时间服务器地址sed -i "s/0.centos.pool.ntp.org/ntp.aliyun.com/g" /etc/chrony.confsed -i "s/1.centos.pool.ntp.org/time1.cloud.tencent.com/g" /etc/chrony.confsed -i "s/2.centos.pool.ntp.org/210.72.145.44/g" /etc/chrony.confsed -i "s/3.centos.pool.ntp.org/time.windows.com/g" /etc/chrony.conf# 修改本地时间客服端地址范围sed -i "s/#allow 192.168.0.0/allow 172.16.0.0/g" /etc/chrony.conf修改 Chrony 服务器端 配置
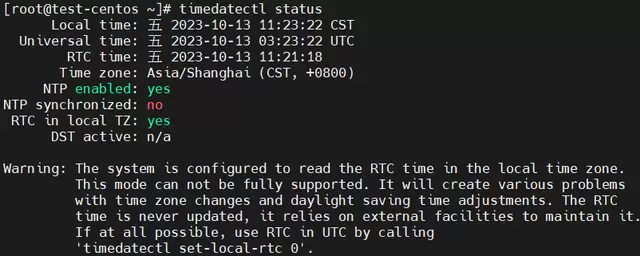
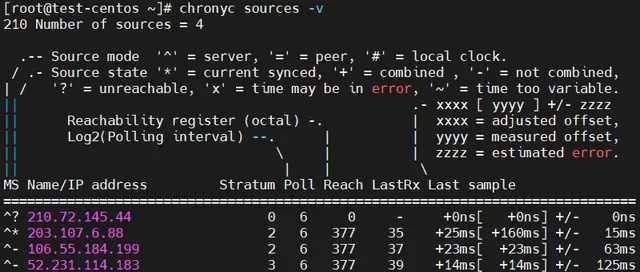
# 防火墙放行NTP服务firewall-cmd --permanent --add-service=ntp && firewall-cmd --reload# 重启 Chrony 服务sudo systemctl restart chronyd.service# 验证 Chrony 服务 是否正常启动,123端口被占用则表示成功启动systemctl status ntpd | grep Active ; netstat -tlunp | grep ntp# 查看 Chrony 服务 时间同步状况timedatectl status# 开启网络时间同步timedatectl set-ntp true# 再次查看 Chrony 服务 时间同步状况timedatectl status# 验证时间同步 chronyc sources -v# 将当前日期时间写入BIOSecho "SYNC_HWCLOCK=yes" >> /etc/sysconfig/ntpd Chrony 服务 时间同步状况
验证时间同步
测试 Chrony 时间服务器
# 在 Windows 端 操作# 有跟踪信息表示成功,显示错误信息表示失败w32tm /stripchart /computer:172.16.28.130正在跟踪 172.16.28.130 [172.16.28.130:123]。当前时间是 2023/10/13 11:25:45。11:25:45, d:+00.0002497s o:-05.7888915s [ * | ]11:25:47, d:+00.0008122s o:-05.9891112s [ * | ]11:25:49, d:+00.0002198s o:-06.1898866s [ * | ]11:25:51, d:+00.0008597s o:-00.0005125s [ * ]11:25:53, d:+00.0008100s o:-00.0005389s [ * ]Chrony 客户端 配置
修改 Chrony.conf 配置文件
# 打开 Chrony.conf 文件sudo nano /etc/chrony.conf# 修改原文件 第 3~6 行,时间服务器内容,将前面配置的 Chrony 服务器的地址写入# {server 172.16.26.130 iburstserver ntp.aliyun.com iburst# }# 修改原文件 第 26 行,时间服务器客户端地址范围# {allow 172.16.0.0/16# }# 方法2:# 修改公网上游时间服务器地址sed -i "s/0.centos.pool.ntp.org/172.16.26.130/g" /etc/chrony.confsed -i "s/1.centos.pool.ntp.org/ntp.aliyun.com/g" /etc/chrony.confsed -i "s/server 2.centos.pool.ntp.org/#server 1.centos.pool.ntp.org/g" /etc/chrony.confsed -i "s/server 3.centos.pool.ntp.org/#server 1.centos.pool.ntp.org/g" /etc/chrony.conf# 修改本地时间客服端地址范围sed -i "s/#allow 192.168.0.0/allow 172.16.0.0/g" /etc/chrony.conf修改 Chrony 客户端 配置
# 重启 Chrony 服务sudo systemctl restart chronyd.service# 开启网络时间同步timedatectl set-ntp true# 查看 Chrony 服务 时间同步状况timedatectl status# 验证时间同步 chronyc sources -v# 将当前日期时间写入echo "SYNC_HWCLOCK=yes" >> /etc/sysconfig/ntpd Chrony 常用命令
# 查看 NTP Serverschronyc sources -v# 查看 NTP Servers 状态chronyc sourcestats -v# 查看 NTP Servers 是否在线chronyc activity -v# 查看 NTP 详细信息chronyc tracking -v # 强制同步时间chronyc -a makestep常见公网时间服务器
210.72.145.44 国家授时中心ntp.aliyun.com 阿里云time1.cloud.tencent.com 腾讯s1a.time.edu.cn 北京邮电大学s1b.time.edu.cn 清华大学s1c.time.edu.cn 北京大学s1d.time.edu.cn 东南大学s1e.time.edu.cn 清华大学s2a.time.edu.cn 清华大学s2b.time.edu.cn 清华大学s2c.time.edu.cn 北京邮电大学s2d.time.edu.cn 西南地区网络中心s2e.time.edu.cn 西北地区网络中心s2f.time.edu.cn 东北地区网络中心s2g.time.edu.cn 华东南地区网络中心s2h.time.edu.cn 四川大学网络管理中心s2j.time.edu.cn 大连理工大学网络中心s2k.time.edu.cn CERNET桂林主节点s2m.time.edu.cn 北京大学ntp.sjtu.edu.cn 202.120.2.101 上海交通大学↓ 没有任何技术含量 ↓
自动化安装脚本
## author: SRover Lee# date: 2023/10/13# Language: Shell Script# description: # 基于CentOS 7.9 定制简易化 Chrony 安装脚本# 1. 卸载所有 Chrony 安装版本残留# 2. 设定时区 为 亚洲/上海# 3. 安装 Chrony 必要组件# 4. 启动 Chrony 服务# 5. 设置 Chrony 为开机自启动 # 6. 检查 Chrony 服务运行状态# 7. 修改 Chrony.conf 配置文件# 8. 设置 Chrony 为开机自启动# 9. 启用 Chrony 服务# 10. 验证 Chrony 服务# 11. 将当前日期时间写入BIOS# # echo ------------------- 卸载所有 Chrony 安装版本残留 -------------------------# 检查系统是否安装有 Chrony 服务rpm -qa | grep chrony# 卸载 现存 NTP服务yum -y remove chrony*echo ------------------- 设定时区 为 亚洲/上海 -------------------------------timedatectl set-timezone Asia/Shanghaiecho ------------------- 安装 Chrony 必要组件 -----------------------------# 安装 Chrony 服务sudo yum install -y chronyecho ------------------- 启动 Chrony 服务 ------------------------------# 启动 Chronysudo systemctl start chronyd.serviceecho ------------------- 设置 Chrony 为开机自启动 --------------------------# 设置 Chrony 为开机自启动sudo systemctl enable chronyd.serviceecho ------------------- 检查 Chrony 服务运行状态 --------------------------# 检查 Chrony 服务运行状态sudo systemctl status chronyd.serviceecho ------------------- 修改 Chrony.conf 配置文件 ------------------------# 修改公网上游时间服务器地址sed -i "s/0.centos.pool.ntp.org/ntp.aliyun.com/g" /etc/chrony.confsed -i "s/1.centos.pool.ntp.org/time1.cloud.tencent.com/g" /etc/chrony.confsed -i "s/2.centos.pool.ntp.org/210.72.145.44/g" /etc/chrony.confsed -i "s/3.centos.pool.ntp.org/time.windows.com/g" /etc/chrony.conf# 修改本地时间客服端地址范围sed -i "s/#allow 192.168.0.0/allow 172.16.0.0/g" /etc/chrony.confecho ------------------- 启用 Chrony 服务 -------------------------------# 防火墙放行NTP服务firewall-cmd --permanent --add-service=ntp && firewall-cmd --reload# 重启 Chrony 服务sudo systemctl restart chronyd.service# 开启网络时间同步timedatectl set-ntp trueecho ------------------- 验证 Chrony 服务 -------------------------------# 查看 Chrony 服务 时间同步状况timedatectl status# 验证时间同步 chronyc sources -vecho ------------------- 将当前日期时间写入BIOS ------------------------------# 将当前日期时间写入BIOSecho "SYNC_HWCLOCK=yes" >> /etc/sysconfig/ntpd echo ----------------------------------------------------------------# 显示提示信息echo echo echo echo echo 已经完成 Chrony 时间服务器 基础安装echo 当前 系统环境 时间信息如下:timedatectl statusChrony.conf 配置文件内容 (附中文注释)
# Use public servers from the pool.ntp.org project.# Please consider joining the pool (http://www.pool.ntp.org/join.html).# 使用 pool.ntp.org 项目中的公共服务器。以server开,理论上想添加多少时间服务器都可以server 0.centos.pool.ntp.org iburstserver 1.centos.pool.ntp.org iburstserver 2.centos.pool.ntp.org iburstserver 3.centos.pool.ntp.org iburst# Record the rate at which the system clock gains/losses time.# 根据实际时间计算出服务器增减时间的比率,然后记录到一个文件中,在系统重启后为系统做出最佳时间补偿调整driftfile /var/lib/chrony/drift# Allow the system clock to be stepped in the first three updates# if its offset is larger than 1 second.# 如果系统时钟的偏移量大于1秒,则允许系统时钟在前三次更新中步进makestep 1.0 3# Enable kernel synchronization of the real-time clock (RTC).# 启用实时时钟(RTC)的内核同步rtcsync# Enable hardware timestamping on all interfaces that support it.# 通过使用 hwtimestamp 指令启用硬件时间戳#hwtimestamp *# Increase the minimum number of selectable sources required to adjust# the system clock.#minsources 2# Allow NTP client access from local network.# 指定 NTP 客户端地址,以允许或拒绝连接到扮演时钟服务器的机器#allow 192.168.0.0/16# Serve time even if not synchronized to a time source.#local stratum 10# Specify file containing keys for NTP authentication.# 指定包含 NTP 身份验证密钥的文件#keyfile /etc/chrony.keys# Specify directory for log files.# 指定日志文件的目录logdir /var/log/chrony# Select which information is logged.#log measurements statistics tracking# 选择日志文件要记录的信息The End
本站部分内容来源于互联网,仅供学习交流之用。如有侵犯您的版权,请及时联系我们,我们将尽快处理。


